


Car detailing might seem like a luxury, but it plays an important role in keeping your vehicle looking good and holding its value. One area that makes the biggest difference? Your car’s wheels. Well-maintained wheels can make your car look sharp and polished, while neglected ones can make it seem old and poorly cared for.
This guide will walk you through how to bring neglected wheels back to life and keep them shining for years. Whether they’re stained, dull, or just need a little TLC, we’ve got you covered!
The Importance of Wheel Care: More Than Just Aesthetics
Before diving into the steps of wheel restoration, let’s talk about why this aspect of detailing is so important. Beyond aesthetics, well-maintained wheels contribute to several other factors:

- Enhanced Vehicle Appearance: Clean, shiny wheels greatly enhance the overall appearance of your vehicle. It’s often the small details that make the biggest impact.
- Preservation of Value: Regular maintenance helps preserve the value of your vehicle. A car that looks well cared for is generally more desirable to potential buyers.
- Prevention of Damage: Neglecting your wheels can lead to more than just dirt. Brake dust, road grime, and environmental contaminants can cause corrosion, pitting, and other damage that can be costly to repair.
- Improved Performance: While not as direct, well-maintained wheels can contribute to better overall vehicle performance. For example, properly maintained tires are important for safety.
Assessing the Damage: The First Step to Restoration
The first step in any wheel restoration project is a thorough assessment. This involves carefully examining your wheels to understand the extent of the damage and identify areas that need special attention.
Initial Inspection
- Brake Dust Accumulation: Pay close attention to the barrel area of the wheels, where brake dust tends to accumulate. This area is often missed during regular washes.
- Road Grime: Check for stubborn road grime and embedded contaminants on the face of the wheels. These substances can bond to the surface over time and become difficult to remove.
- Tar Spots and Fallout: Look for tar spots and industrial fallout, especially on the lower sections of the wheels. These contaminants can cause significant damage if left untreated.
- Oxidation and Pitting: Check for heavy oxidation on the clear coat and visible pitting from prolonged exposure to corrosive elements.
- Document the Process: Taking detailed photos before you start can be useful in documenting the transformation and highlighting specific areas that need extra attention. This also allows you to see the dramatic improvement that results from your work.
Gathering the Right Tools and Products
Having the right tools and products is essential for a successful wheel restoration project. Here’s what you’ll need:
- Professional-grade Wheel Cleaner: Look for a pH-balanced wheel cleaner that is effective at removing brake dust and grime without damaging the wheel finish.
- Bug and Tar Remover: A specialized bug and tar remover is crucial for handling stubborn deposits that won’t come off with regular cleaning.
- Ceramic Detailing Spray: A ceramic detailing spray provides long-lasting protection against brake dust and environmental contaminants. It also adds an impressive gloss to the wheels.
- Wheel Brushes: Various wheel brushes are essential. You’ll need soft-bristled brushes for delicate surfaces, stiffer brushes for stubborn debris, and detail brushes for intricate areas.
- Microfiber Towels: High-quality microfiber towels are necessary to prevent scratching during the cleaning and drying processes.
- Pressure Washer: A pressure washer with appropriate nozzles allows for thorough cleaning without damaging the wheel surface.
- Applicator Pads: For applying tire gel, applicator pads help ensure even distribution.
- Tire Gel: Tire gel protects against UV damage, premature aging, and enhances the appearance of your tires.
The 5-Step Deep Cleaning Process
Now that you’ve assessed the wheels and gathered your tools, it’s time to get down to the deep cleaning process. This process will help you tackle even the most neglected wheels.
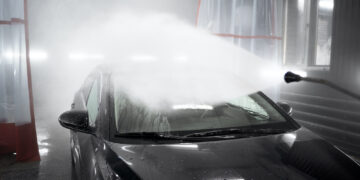
Step 1: Initial Rinse and Pre-treatment
- Pressure Rinse: Start by rinsing the wheels thoroughly with a pressure washer to remove any loose debris. Maintain an appropriate distance to avoid damaging the wheel surface.
- Apply Wheel Cleaner: Apply the wheel cleaner generously, making sure to cover all surfaces of the wheel. The chemical reaction should be visible as the product turns purple when contacting iron particles.
- Allow Dwell Time: Let the cleaning solution dwell for 3-5 minutes, but don’t allow it to dry on the surface. This time is essential to allow the cleaner to break down the stubborn contaminants.
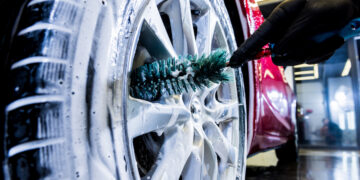
Step 2: Agitation and Detail Work
- Brush the Face of the Wheel: Use a soft-bristled brush with gentle circular motions to clean the wheel face.
- Brush the Barrel: Use a longer wheel brush to clean the barrel area, ensuring complete coverage of the inner surfaces.
- Detail Work: Pay special attention to lug nut areas and small crevices where brake dust tends to accumulate.
- Address Stubborn Stains: For particularly stubborn stains, apply bug and tar remover directly to the affected areas. Work the product into these spots with detail brushes, being careful not to scratch the wheel surface.
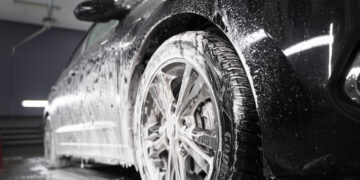
Step 3: Final Cleaning and Drying
- Comprehensive Rinse: Perform a thorough rinse with the pressure washer, ensuring all cleaning solutions are completely removed. Pay close attention to hidden areas where product residue might remain.
- Drying: Dry the wheels using fresh microfiber towels, working from the face of the wheel inward. Pat the surface dry rather than wiping, to prevent scratching. Use separate towels for different areas to avoid cross-contamination.
Step 4: Applying Protective Coatings
- Ceramic Spray: Apply a ceramic detailing spray, working in small sections to ensure even coverage. Buff the surface properly.
- Tire Gel: Apply tire gel using an applicator pad, ensuring it’s evenly distributed. Allow the gel to cure for optimal results, removing any excess to prevent sling during driving.
Step 5: Ongoing Maintenance
- Regular Cleaning: Establish a bi-weekly cleaning routine to prevent significant buildup and reduce the time and effort required for each cleaning session.
- Brake Dust Shield: Consider applying a brake dust shield to your brake system to minimize future accumulation.
- Reapply Coatings: Reapply protective coatings every 3-4 months, depending on driving conditions and exposure to elements.
- Regular Inspection: Regular inspection can help identify any issues before they become significant problems.
Actionable Tips for Maintaining Wheel Shine
- Prevention is Key: Remember, prevention is always easier than correction. By maintaining a regular cleaning schedule, you can avoid significant buildup and reduce the time needed for cleaning.
- Don’t Skip the Barrel: Pay special attention to the barrel of your wheels, as this area is often neglected and tends to accumulate brake dust and grime.
- Use the Right Products: Always use pH-balanced wheel cleaners to avoid damaging your wheel finish.
- Gentle is Better: Use gentle circular motions and soft-bristled brushes to prevent scratching, even when dealing with stubborn grime.
- Rinse Thoroughly: Make sure to rinse all cleaning solutions completely to avoid residue buildup.
- Dry Properly: Pat dry with microfiber towels instead of wiping to prevent scratches.
- Protect Your Investment: Applying protective coatings after cleaning can significantly extend the time between cleaning sessions.
Key Points to Remember
- Wheel care is crucial for both aesthetics and vehicle longevity. Neglected wheels can lead to costly repairs and reduce the vehicle’s value.
- A thorough assessment is the first step. Before you start cleaning, identify the extent of the damage and gather the necessary tools and products.
- The deep cleaning process involves multiple steps. Proper technique, combined with quality products, is key to effective cleaning.
- Protective coatings are vital for long-term maintenance. These coatings protect your wheels from future damage.
- Regular maintenance is the key to a long-lasting shine. By establishing a routine, you can minimize the time and effort required for each cleaning session.
By following these tips, you can transform your car wheels from neglected to showroom-quality, ensuring that your vehicle always looks its best. Remember, the time and effort you invest in proper wheel care will not only enhance your vehicle’s appearance but also contribute to its longevity and performance.